
E-Commerce is on a roll right now. With COVID-19 cases on the upswing and no definite end in sight, many businesses – both small and large – are turning to online shops to sell their products. A lot of big companies have the budget to rent out studio space and pay a professional photographer in order to make their products look as appealing as possible. Small businesses might feel that they lack the resources to have outstanding product photography.
We’re here to tell you don’t be afraid! There are many tricks and things you can do to make your products look just as great at a much more affordable price. Let us introduce you to the 5 key steps you can follow to photograph your products in your own home studio.
1. Find a light source to light the product
A light source is a staple for taking strong pictures. For those of us who don’t keep full functioning light sets stashed in the corner of our basements we are forced to turn to other items that emit light.
Things like sunlight, lamps without lampshades, desk lamps, or even flood lights can act as amazing light sources for photo taking. Don’t be afraid to get creative! The goal of the setup is to find items that will shine onto the product and showcase it in an attractive way. The key here is finding the right amount of light you need, don’t wash your product out with too much light, but don’t use too small of an amount where the product blends in with the shadows.
2. Find backdrop(s)
A backdrop can be just about anything, the only requirement is that it cannotdistract from the item you are trying to showcase. I like to use a large white sheet, however, when using white fabric, it’s important that it is thick enough that you cannot see through it. Other people use different solid colors such as gray, black, or even a light blue. Depending on the product you are showing you may need just a backdrop or you may need a second piece of fabric to place your product on top of.
3. Set up your studio
Setting up a studio is a daunting task for those who have never done it before, but it’s a lot easier when you have followed the previous two steps.
First, grab a card table or something of the sorts that you can place your product on and cover it with a sheet. If you sell something that is worn, then you can use a mannequin or a model instead. If you are interested in learning how to set up the studio for a product that is on a model or mannequin check out this blog.
Lay one of your backdrops over the table and ensure there are no heavy creases in it. Use a steamer or an iron if you need to get the folds out. This allows for your backdrop to appear smooth in the photo. After that, place your second back drop in the background. You can use pins to pin it to the wall or hang it using clips somewhere. If you cannot find two pieces of fabric that are the same, then pin the backdrop to the wall and let it cover the table your product will be on as well. Think of it as a rounded backdrop.
It’s time to set up your lights.
It’s best to get your brightest light as close to your camera lensas you possibly can without your own shadow getting in the way, this eliminates distracting shadows and makes your photos look professional. This light is called your key light, the next light you need is your fill light.
Place a second light to the side of your object, this object adds an accent light to your product to bring out more details, it’s important to ensure this light is either not as bright as your key light or a little softer.
If you have a third light laying around you can utilize it as a background light. It’s main purpose is to add a little light to your background, I find this is very helpful when shooting on a white backdrop because it makes the white pop. If you don’t have access to a third light, don’t worry! It’s not required, just recommended.
Experiment with your lighting.
Not even professionals get their lighting right on the first try. See how you can manipulate the light to make your product look as attractive as possible. Observe shadows and highlights, move the lights around until you are satisfied.
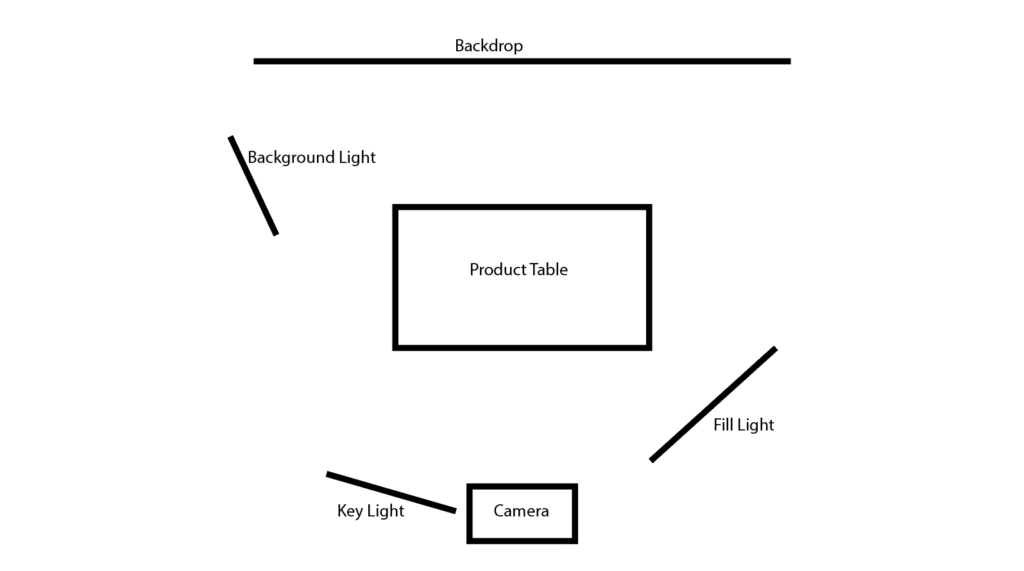
Attached here is a photo of how your product should be set up from an aerial view:
4. Take your photos!
This is the fun part! Grab your camera or your phone and get ready to take pictures. It’s important to get to the level of your product, take the time to lower your camera down so that it looks like the product is staring you right in the face, no one wants to see the top of your product!
Double check for wrinkles in the fabric of your product or backdrop and also take notice of the shadows. Are there ugly shadows on your product? Is there a loose thread or weird scratch? These are small things that are hard to notice before taking a picture so make sure to take advantage of test shots. Once you have determined your desired look and succeeded in making it happen experiment with the layout of your product in order to get a variety of looks.
5. Edit your photos using a photo editing app
Assuming you now have your newly taken photos on your phone the next step is editing them using a photo editor. There are many amazing free photo editors out on the app stores, the one that I use is VSCO. This app is minimal yet offers a large selection of editing tools controlled by sliders that are easy to use.
Experiment with the exposure slider to brighten your image if you were not able to get enough light on your product. Also take advantage of the highlight/shadow slider to either increase or eliminate the light/dark shades are in your photos. If you used a light colored (or white) backdrop I recommend upping the brightness and highlights of your photo, so the backdrop looks smooth.
Make sure to save and export your photo and there you go! You now have your own functioning home studio completed in 5 steps that you can now use for your e-commerce business.
Good photography is key for showcasing your products, whether for your website or for social media. Check out our companion article and guide to photographing products for Instagram here.